
The 1992 corvette remover tail lights for led load resistor was a culmination of the application of American automotive craftsmanship, as both fast as well as beautiful in disguise. However, its unique style and power have made it a classic among car enthusiasts and still is to this day. Many Corvette owners throughout the years have sought to update this, or that of their Chevy Corvette, with many of those modifications including a lighting upgrade. It usually takes the form of substituting the existing tail lights with LED ones.
The bright and power saving with long lasting performance has made them user’s favorite. But replacing with LED tail lights may bring problems, for example, LED tail lights hyper flashing or turn signals not working. The reason for this is that LEDs use less power than ordinary incandescent bulbs so the car’s electrical system wrongly perceives the diminished power draw as a fault. The solution to this problem requires load resistors, as it had to be.
This step by step detailed guide will be showing you how to remove the tail lights on a 1992 corvette safely and install LED load resistors to allow for seamless upgrade with excellent functioning.
Performance that improves the function of your car.
Though the 1992 corvette remover tail lights for led load resistor make for an upgrade that doesn’t seem entirely necessary, there are some worthwhile benefits to upgrading to LED tail lights on a 1992 Corvette. It is the one of the most compelling benefits: enhanced visibility. LEDs produce a crisp, bright light which gets the attention of other drivers even in adverse weather conditions and thus contribute a lot to road safety. The other factor driving the popularity of LED upgrades is energy efficiency. Incandescent bulbs require much power compared to LEDs which require only a fraction of it. We can say that this efficiency will help to reduce your car system and battery drain, and it will be a better alternative for your car electrical system.
Also, LEDs have a long lifespan. Quickly burning out, traditional bulbs need to be replaced quite often. On the other hand, LEDs can last an astonishing twenty five times longer than an equivalent bulb thus saving on maintenance costs and the hassle of frequent bulb changing. Lastly, the stylish and modernity of LED lights raise this classic 1992 Corvette to the modern times. This enhancement of aesthetics enables car owners to keep the ageless attraction of their vehicle and complement technology which is latest.
Tools and Materials Required
Since the beginning of this project, we need to obtain all the tools and supplies that we will need to complete the project with the least hassle and in the shortest possible time. The task will also be easier and less issues will surface if you have the right equipment at hand.
Recommended items include screwdrivers (of the flathead and Phillips varieties), a socket wrench set (for mounting bolts), and a panel removal tool (in order to remove trim pieces if necessary). Besides this, you will require 50W 6-ohm load resistors, compatible 1992 corvette remover tail lights for led load resistor, and heat resistant electrical tape or heat shrink tubing to secure connections. Wire connectors, soldering kit, multimeter for testing circuits, zip ties — all of this will be useful. Having these items ready before starting will make the entire process easy and would take less time.
How to Remove Tail Lights on a 1992 Corvette: Step by Step.
The safety precautions are put into place.
However, it is important to always act with safety in mind when working on electrical components of your vehicle. Start by separating the negative terminal of car battery to avoid electricity shocks or short circuits.
Locate the Tail Light Assemblies.
Then, open the trunk and find where the lights are situated at the rear panel. From this location, the mounting points and wiring connections are accessible.
Remove the Rear Panel Cover.
Take a panel removal tool or a flathead screwdriver and, as cautiously as possible, disengaging the covering without harm.
The Tail Light Mounting Bolts will need to be unscrewed.
Locate the bolts that hold the tail light assemblies. These bolts can be removed with a socket wrench and kept safe and sound for reassembly.
Disconnect the Wiring Harness.
Unplug the wiring connectors from the back of the tail light assemblies gently. Correct reinstallation requires paying attention to wire colors and positions. Label wires if needed.
Carefully Remove the Tail Light Assembly
Pull the tail light housing out of position, carefully, so as to not damage components, with mounting bolts and wiring disconnected.
Installing LED Load Resistors
Identify the Turn Signal Wires
Voltage can be measured with a multimeter that confirms the right wires. It turns out to be a 12V current when a turn signal wire is activated.
Load Resistors Must Be Selected as A Suitable Mounting Location
Heat is generated by load resistors, so select a heat safe location to mount. Find an area around the tail light assembly free from plastic and other components, that is made of metal.
Connect the Load Resistors.
Wire connectors or solder the connections. Make sure connections are tight and stable to avoid such problems.
Secure the Load Resistors
The load resistors can be fastened to a chosen metal surface using zip ties. Make sure they are not in contact with something which could be damaged by heat.
Test the Tail Lights
Then, reconnect the vehicle’s battery and test the turn signals to confirm the hyperflashing is resolved. Test brake lights, turn signals and hazard lights.
Reassemble the Tail Light Assembly.
Carefully reinstall the tail light housing until the load resistors and LED lights are working correctly. There will generally be at least one mounting about the illumination location, secure these and replace any trim pieces.
Common Troubleshooting Issues and Solutions
Overheating Load Resistors
There will be some heat, but too much heat means either the resistor is not the correct rating or the mounting is improper. Heat should be dissipated and secured on a metal surface.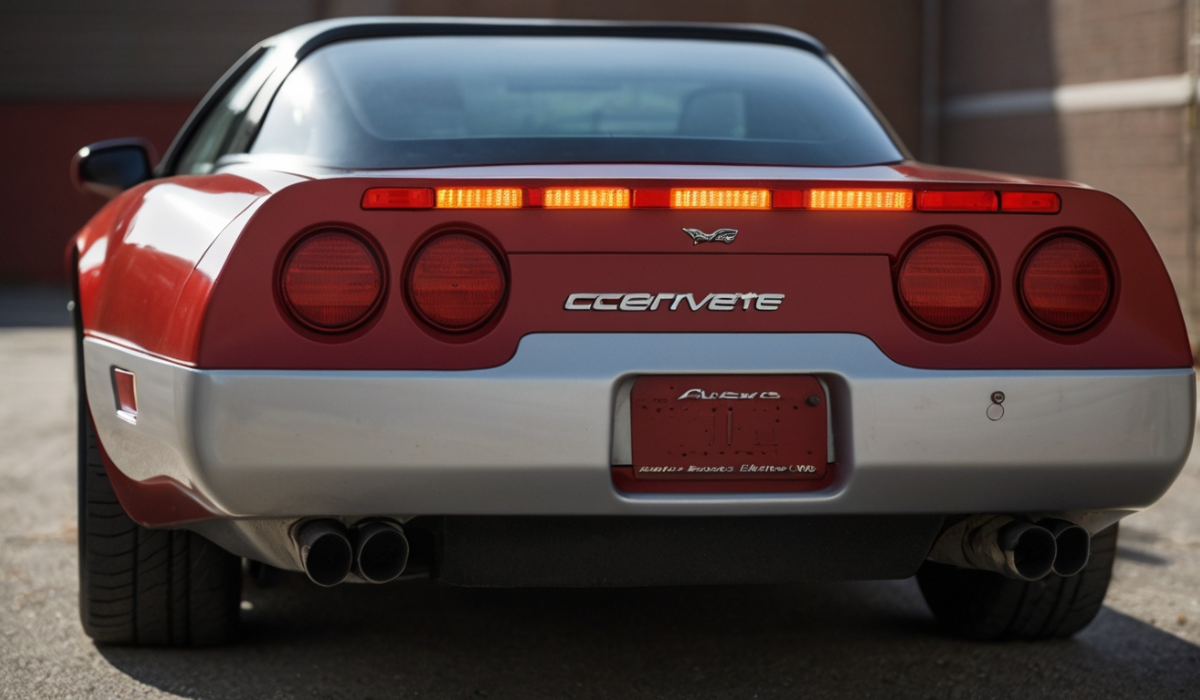
Non-Functioning Lights
If tail lights won’t work have there been loose connections for wiring. Verify whether any of the vehicle fuses in the circuit that operates the tail light are not good.
Conclusion
Upgrading your 1992 corvette remover tail lights for led load resistor with modern LEDs and installing proper load resistors results in safer, more efficient, and nicer tail lights. If you follow along in the comprehensive guide that follows, you can complete this upgrade on your own, with confidence that the result will be professional and reliable.
This enhancement allows you to take pleasure in the classic style and phenomenal performance your Corvette delivers, but with modern lighting technology. From cruising down a non traffic country road to dropping the top down at your local car meet, your upgraded tail lights will be surely liked.